The Soul of a New Machine -
Designing, Building and Running 'The Short Lady'
Focused Wave Valveless Pulsejet Engine
by Larry Cottrill
_____________________________________________________
Introduction
In the summer of 2004, I managed to design, build and run my first
successful pulsejet, a crude valveless design I called Elektra I
[since it was cheaply built entirely out of ordinary rigid
electrical conduit]. This design was duplicated by high school
student Steve Bukowsky of Connecticut, USA, also with good success
[Steve already had some pulsejet building experience with valved
designs]. The story of the Elektra I can be seen at the Elektra I
Builders' Web Log, www.elektra1.blogspot.com The length and
proportions of this engine were awkward, however [the design had
to be lengthened to 39 inches - almost a full metre - to sustain
running!].
A couple of things happened at about this time on Kenneth Moller's
Valveless Pulsejet Forum that changed my ideas about valveless
engine design: First, Australian jet builder Ross Gordon had done
some experimenting with shoving intake pipes into the combustion
chamber to varying depths, and observed that there is a kind of
'sweet spot' for the inner end of the pipe, where the breathing of
the engine seems optimal. Second, an American experimenter, Bill
Hinote, mentioned his interesting observation that several
successful valveless engine designs with rear-facing intakes
seemed to have a couple of proportions in common; namely, that
these closed-end designs have intake ducts that were almost
exactly 1/5 the total engine length, and seemed positioned in such
a way that the intake opening ended up at almost exactly the 1/3
length point from the front end plate of the engine! [I found this
fascinating, and decided that these proportions should be called
'The Hinote Criteria' for this class of valveless jets.]
I now felt I had to carry this farther. It seemed to me that the
most critical point in such a design was the point at which the
intake pipe opens into the main wave path, a point which we on the
forum eventually came to call the 'Reynst Point' [i.e. the point
where the low pressure wave of the engine is ideally applied to
make the engine breathe for the next pulse]. I pointed out that,
in the case of an engine where the Hinote Criteria apply, this
point is very nearly at the L/8 point of the engine length [where
we call the full pipe length L, by convention].
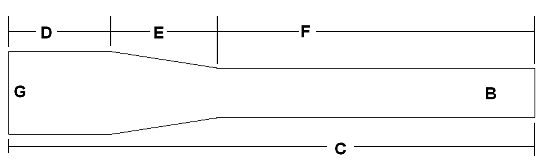
I then hypothesized that any engine closed at the front should
breathe at the L/8 Reynst Point, if provided with an approximately
L/5 intake pipe that enters the wave path at that point, from any
direction. [It turns out that this isn't quite true for every
closed-end design; but it may be true for engines where the main
tube is a more-or-less straight pipe from nose to tail.] So, the
relationship of the three fractional dimensions would look
something like this:
A Simple Engine from a Simple Theory
I had felt for a while that the traditonal 'flashlight shaped'
tailpipe design, while good at providing high velocity exhaust
gas ejection, had the inherent flaw that much of the blast
energy of the explosion was wasted in high frequency 'standing
waves' that keep vibrating in the chamber after the main wave
has moved rearward. I believed that the simplest, most effective
design would be a shallow domed front end where the explosion
would take place, followed immediately by a long conical chamber
'focusing' the blast wave into the front of the tailpipe. I call
this concept the 'focused wave pulsejet engine', which became
[unfortunately] immediately abbreviated to 'focused wave engine'
or FWE. [I say 'unfortunately' because this makes it sound like
a 'wave engine', which it is not - this IS a pulsejet in the
truest sense of the word.]
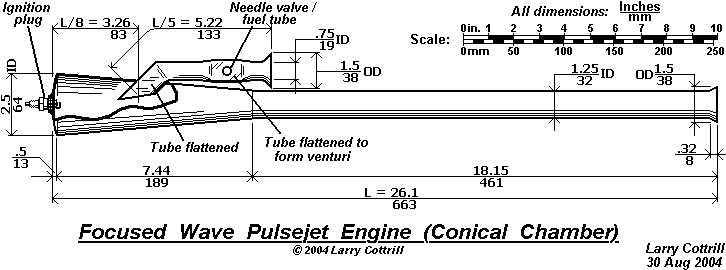
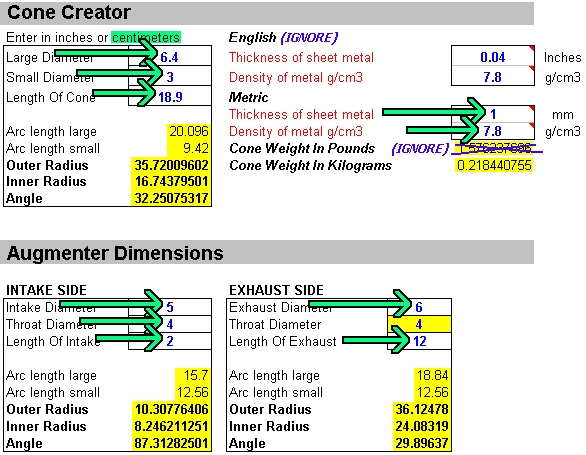
I used the software tool UFLOW1D to design the chamber. To my
amusement, eliminating the high-frequency 'ringing' in the
chamber involved an even longer cone than I had imagined, with
a very long side slope - the cone takes up almost ONE
THIRD of the total engine length! However, this produced very
good wave shape and travel, both for the blast wave and suction
wave, even in an engine as short as 26 inches! This is very
unusual in a valveless design; hence, the code name 'Short
Lady'. Here's the original drawing as posted to Kenneth Moller's
Valveless Pulsejet Forum:
Original Prototype Build: Steve Bukowsky
Strangely, having designed the engine, I now felt that I didn't
have adequate facilities to build the prototype! [I've never had
to roll my own sheet steel cones, and have no equipment to make
nice work of them.] Fortunately, Steve Bukowsky, a young member
of the pulse-jets.com forums, really liked the design and
immediately offered to build the prototype! Since he had access
to his school shop facilities and needed a project to work on,
I naturally readily agreed, realizing that this would probably be
the shortest path to seeing the engine actually built and tested.
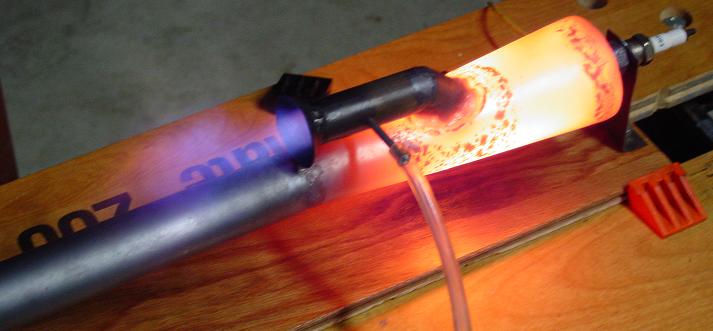
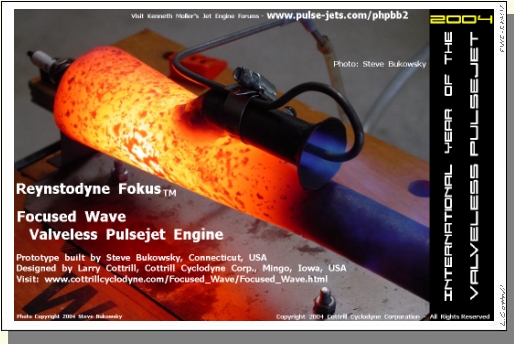
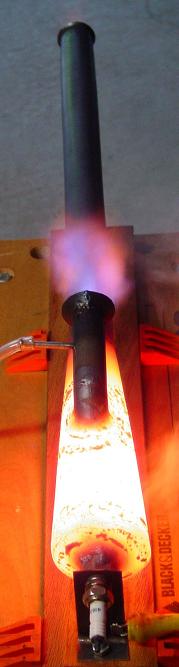 Steve Bukowsky's original 'Short Lady' build, running
"full grease" on propane vapor fuel - exhaust
ejection from the rear-facing intake can be clearly
seen in this photo. Steve's 'Short Lady' started and
ran on the very first try!
Photo Copyright 2004 Steve Bukowsky
Steve Bukowsky's original 'Short Lady' build, running
"full grease" on propane vapor fuel - exhaust
ejection from the rear-facing intake can be clearly
seen in this photo. Steve's 'Short Lady' started and
ran on the very first try!
Photo Copyright 2004 Steve Bukowsky
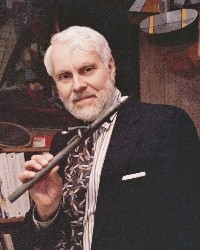
 Jet experimenter Steve Bukowsky
Photo Copyright 2004 Larry Cottrill
My First [Second Prototype] Build of
the 'Short Lady', in Pictures
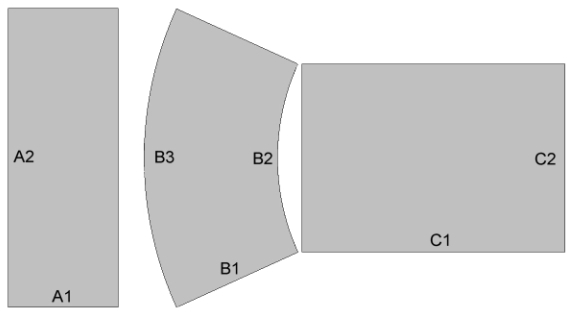
Since Steve had obviously done such a beautiful
job of fabricating the cones in his school shop, I
negotiated with him to make two sets of cones
for me, at a very reasonable price. Here is Steve's
shot of the combustion chamber parts as he was
working on them for me, alongside his finished
'Short Lady' engine. Note that the wall cones are
fully formed and tack welded in this shot; the
front end cones [which I call "domes"] are cut
but not yet rolled and tacked [he did that as
well, before shipping them to me]:
Jet experimenter Steve Bukowsky
Photo Copyright 2004 Larry Cottrill
My First [Second Prototype] Build of
the 'Short Lady', in Pictures
Since Steve had obviously done such a beautiful
job of fabricating the cones in his school shop, I
negotiated with him to make two sets of cones
for me, at a very reasonable price. Here is Steve's
shot of the combustion chamber parts as he was
working on them for me, alongside his finished
'Short Lady' engine. Note that the wall cones are
fully formed and tack welded in this shot; the
front end cones [which I call "domes"] are cut
but not yet rolled and tacked [he did that as
well, before shipping them to me]:
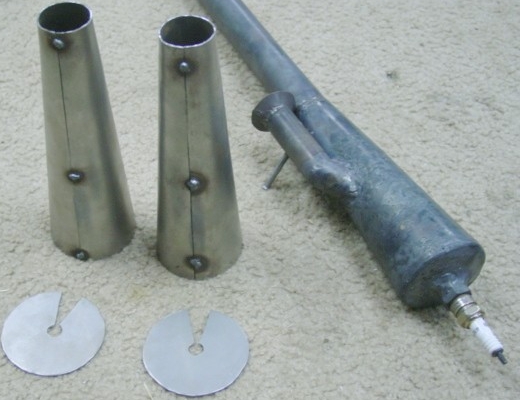 Photo Copyright 2004 Steve Bukowsky
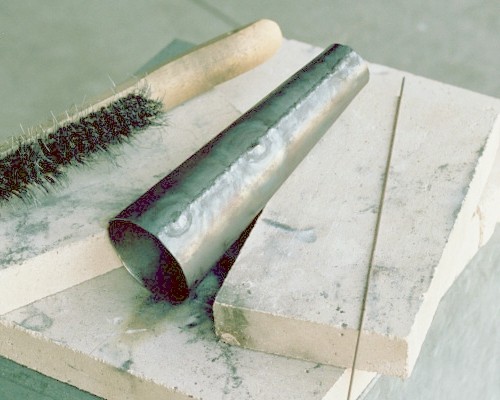
Here's the combustion chamber wall cone, right after I finished
the side seam welding:
Photo Copyright 2004 Steve Bukowsky
Here's the combustion chamber wall cone, right after I finished
the side seam welding:
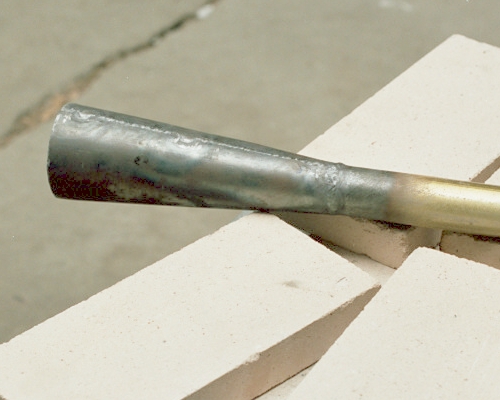
 And here it is welded up to the 'antenna mast' tailpipe. The
finish weld is reasonably reinforced, smooth inside and out, and
holds the chamber in near-perfect alignment with the tube
[internal smoothness is the critical issue here; any slight error
in alignment is of little consequence]:
And here it is welded up to the 'antenna mast' tailpipe. The
finish weld is reasonably reinforced, smooth inside and out, and
holds the chamber in near-perfect alignment with the tube
[internal smoothness is the critical issue here; any slight error
in alignment is of little consequence]:
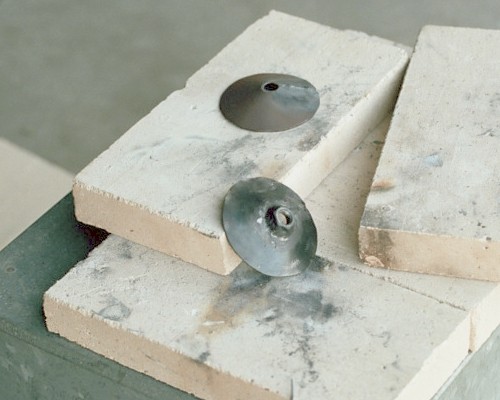
 Here's the finished front end dome with the spark plug mount
welded in place, with a second dome in the background,
waiting to be finished up in the same way:
Here's the finished front end dome with the spark plug mount
welded in place, with a second dome in the background,
waiting to be finished up in the same way:
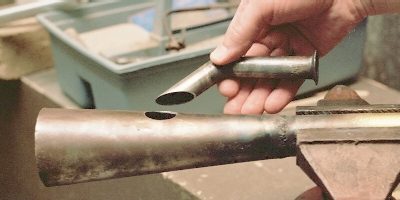
 Steve followed my design exactly, using 3/4-inch EMT [rigid
electrical conduit] to built his intake tube and flattening the
lower end slightly. His testing indicated that the intake drag
was extremely low, possibly not a good thing for performance.
Based on Steve's experience, I felt I could try reducing the intake
to 1/2-inch EMT, leaving the tube round. The hole is formed by
drilling and filing, trying to get the exact location and fit:
Steve followed my design exactly, using 3/4-inch EMT [rigid
electrical conduit] to built his intake tube and flattening the
lower end slightly. His testing indicated that the intake drag
was extremely low, possibly not a good thing for performance.
Based on Steve's experience, I felt I could try reducing the intake
to 1/2-inch EMT, leaving the tube round. The hole is formed by
drilling and filing, trying to get the exact location and fit:
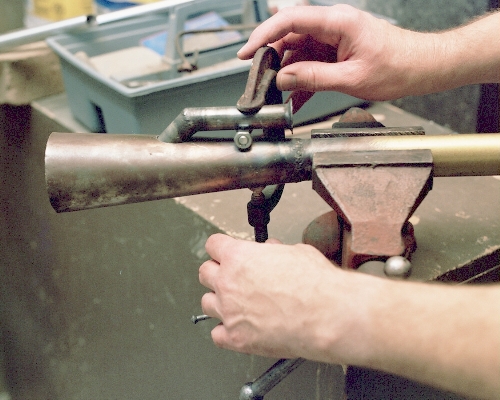
 Another difference in our methods: I wanted to mount the intake
tube before welding on the front dome, for the sake of checking
the tube alignment. I jigged the intake for tack welding by using
a 5/16-inch bolt and nut and an old C-clamp:
Another difference in our methods: I wanted to mount the intake
tube before welding on the front dome, for the sake of checking
the tube alignment. I jigged the intake for tack welding by using
a 5/16-inch bolt and nut and an old C-clamp:
 I wanted engine mount lugs identical to the ones on my Elektra(TM)
engines. Two identical engine mounts are cut from a single hardware
store item called a 'fence rail bracket'. After this, the existing
holes are drilled out to fit 1/4-inch mounting bolts.
I wanted engine mount lugs identical to the ones on my Elektra(TM)
engines. Two identical engine mounts are cut from a single hardware
store item called a 'fence rail bracket'. After this, the existing
holes are drilled out to fit 1/4-inch mounting bolts.
 These are temporarily bolted down to a flat piece of metal through
properly spaced holes, then bent inward to meet the underside of
the tailpipe, and tack welded in place [located right under the
balance point of the engine]. Then, they're unbolted and finish
welded onto the tailpipe.
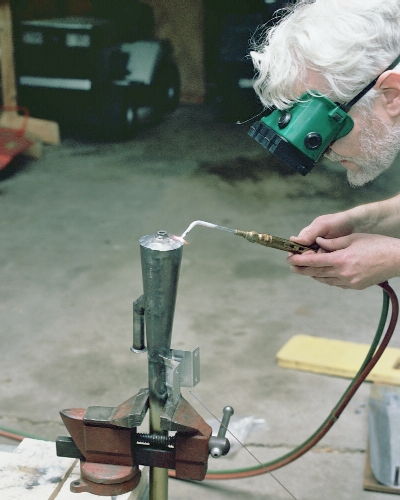
The final weld of the entire project - getting the front dome welded
on, mostly by just melting the edges together:
These are temporarily bolted down to a flat piece of metal through
properly spaced holes, then bent inward to meet the underside of
the tailpipe, and tack welded in place [located right under the
balance point of the engine]. Then, they're unbolted and finish
welded onto the tailpipe.
The final weld of the entire project - getting the front dome welded
on, mostly by just melting the edges together:
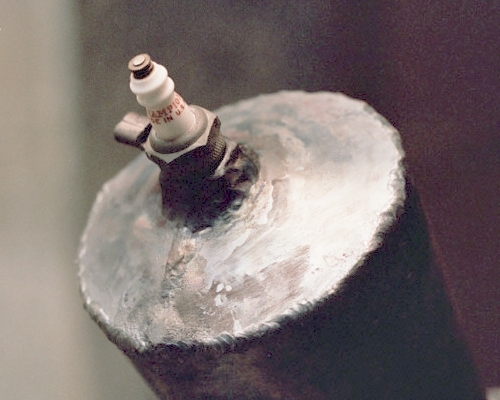
 The finish welded front end dome of the chamber, seen here with
the spark plug temporarily threaded into place:
The finish welded front end dome of the chamber, seen here with
the spark plug temporarily threaded into place:
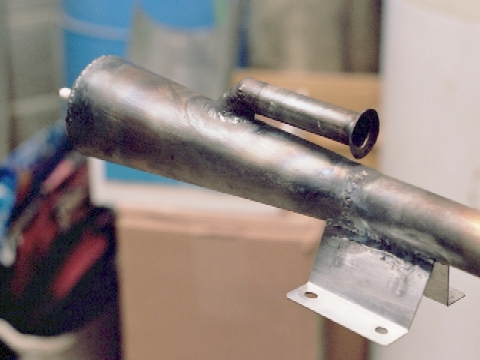
 Closeup of the finished front end, seen from the left rear. In
this view, the intake weld, cone-to-tailpipe weld and engine mount
weld are all clearly seen:
Closeup of the finished front end, seen from the left rear. In
this view, the intake weld, cone-to-tailpipe weld and engine mount
weld are all clearly seen:
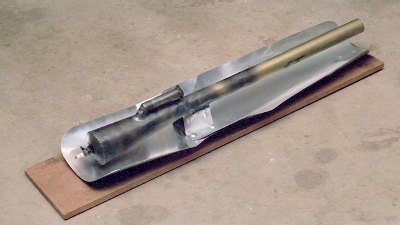
 The finished engine mounted on a flat wood plank, about 3/4 inch
thick and about 6 inches wide. The best heat shielding material is
sheet aluminum, which is light, cheap and very easy to work with.
The bolts I used are short, large head 1/4-inch aluminum bolts;
1/4-20 'tee nuts' are driven into the holes from the bottom side
of the board. The result is an engine and test mount assembly
that can be easily handled and clamped down to something heavy
when needed:
The finished engine mounted on a flat wood plank, about 3/4 inch
thick and about 6 inches wide. The best heat shielding material is
sheet aluminum, which is light, cheap and very easy to work with.
The bolts I used are short, large head 1/4-inch aluminum bolts;
1/4-20 'tee nuts' are driven into the holes from the bottom side
of the board. The result is an engine and test mount assembly
that can be easily handled and clamped down to something heavy
when needed:
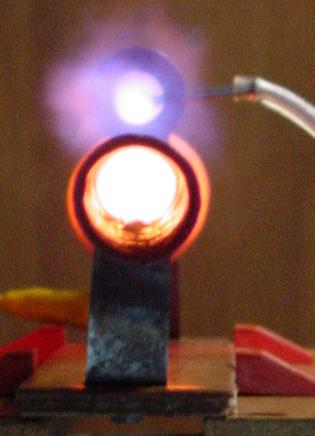
 My starting rig is nothing but a high voltage spark coil, propane
supply and a shop vac rigged as a blower. Once she starts, you
just shut off the air and spark and sit back and enjoy
the roar of the 'Short Lady' Focused Wave Valveless Pulsejet -
note the front end getting good and hot after just a few seconds
of running:
My starting rig is nothing but a high voltage spark coil, propane
supply and a shop vac rigged as a blower. Once she starts, you
just shut off the air and spark and sit back and enjoy
the roar of the 'Short Lady' Focused Wave Valveless Pulsejet -
note the front end getting good and hot after just a few seconds
of running:
 It should be able to run as long as you want [or until the
propane cylinder 'freezes up' from the internal pressure drop] -
just shut the fuel off at the needle valve to stop it.
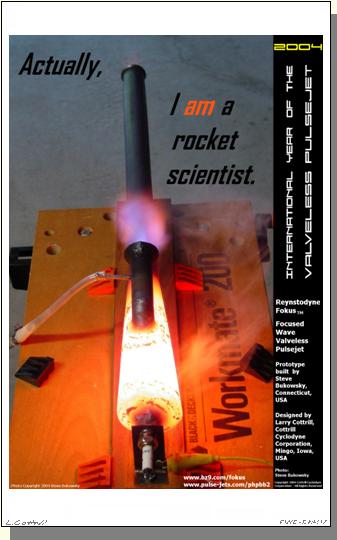
Steve's 'Short Lady' Photo Gallery
During the summer of 2004, Connecticut high school
student Steve Bukowski decided to build a working
prototype of my "five dollar valveless pulsejet", the
Elektra I, which I had just designed, built and
successfully run. Steve built his in just a few hours,
and got it running with little difficulty. Here's Steve's
parody of my 'What every man needs is a jet to
fly' promotional shot, featuring the Elektra I [yes,
that thing under his hand is the engine!]:
It should be able to run as long as you want [or until the
propane cylinder 'freezes up' from the internal pressure drop] -
just shut the fuel off at the needle valve to stop it.
Steve's 'Short Lady' Photo Gallery
During the summer of 2004, Connecticut high school
student Steve Bukowski decided to build a working
prototype of my "five dollar valveless pulsejet", the
Elektra I, which I had just designed, built and
successfully run. Steve built his in just a few hours,
and got it running with little difficulty. Here's Steve's
parody of my 'What every man needs is a jet to
fly' promotional shot, featuring the Elektra I [yes,
that thing under his hand is the engine!]:
 Poster Copyright 2004 Steve Bukowsky
After school started at the end of summer, Steve was looking
for a more challenging pulsejet project, since he once again
had access to his school's metal shop equipment. So, when I
announced a new design, the 'Short Lady', on Kenneth
Moller's Valveless Pulsejet Forum, Steve asked if he could
be the first one to try to build one. Since I had no way of
rolling the sheet steel cones, I was happy to have him give
it a go.
Since Steve built [and ran!] the world's first prototype of
the Focused Wave engine, he was able to get the first photos
of it, including some fine shots of it running in almost
total darkness. Some of these lose a lot due to size reduction
for this page, unfortunately, but they still give a good idea
of the drama of building and running the 'Short Lady':
Steve's test mount - he doesn't like welded-on
mounting lugs, so he just held it with metal brackets at
the spark plug and the tailpipe:
Poster Copyright 2004 Steve Bukowsky
After school started at the end of summer, Steve was looking
for a more challenging pulsejet project, since he once again
had access to his school's metal shop equipment. So, when I
announced a new design, the 'Short Lady', on Kenneth
Moller's Valveless Pulsejet Forum, Steve asked if he could
be the first one to try to build one. Since I had no way of
rolling the sheet steel cones, I was happy to have him give
it a go.
Since Steve built [and ran!] the world's first prototype of
the Focused Wave engine, he was able to get the first photos
of it, including some fine shots of it running in almost
total darkness. Some of these lose a lot due to size reduction
for this page, unfortunately, but they still give a good idea
of the drama of building and running the 'Short Lady':
Steve's test mount - he doesn't like welded-on
mounting lugs, so he just held it with metal brackets at
the spark plug and the tailpipe:
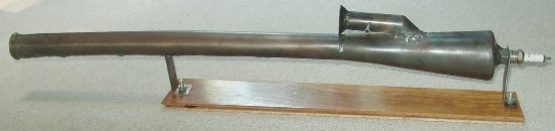 Photo Copyright 2004 Steve Bukowsky
Top view from the front and a rear view from up close:
Photo Copyright 2004 Steve Bukowsky
Top view from the front and a rear view from up close:
 Both photos Copyright 2004 Steve Bukowsky
A nice view of the combustion chamber:
Both photos Copyright 2004 Steve Bukowsky
A nice view of the combustion chamber:
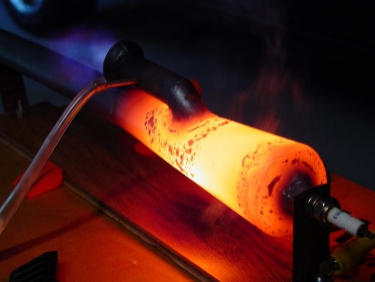 Photo Copyright 2004 Steve Bukowsky
Good top view showing flame ejection from the
rear-facing intake:
Photo Copyright 2004 Steve Bukowsky
Good top view showing flame ejection from the
rear-facing intake:
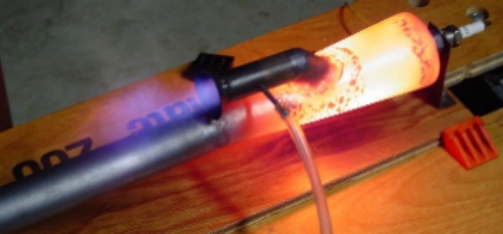 Photo Copyright 2004 Steve Bukowsky
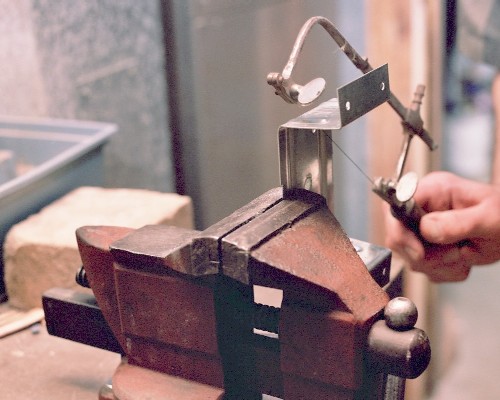
Steve's homebuilt rig for thrust measurement, using
precision lab scale on loan from school:
Photo Copyright 2004 Steve Bukowsky
Steve's homebuilt rig for thrust measurement, using
precision lab scale on loan from school:
 Photo Copyright 2004 Steve Bukowsky
Another shot of the thrust measurement rig, showing
the entire test equipment setup - starting air [he used a
compressor and hand-held valve], propane supply and
ignition system:
Photo Copyright 2004 Steve Bukowsky
Another shot of the thrust measurement rig, showing
the entire test equipment setup - starting air [he used a
compressor and hand-held valve], propane supply and
ignition system:
 Photo Copyright 2004 Steve Bukowsky
_____________________________________________________
Photo Credits:
All photos in this article were provided by, and are property of,
the author or Mr Steve Bukowski [used by permission].
_____________________________________________________
Larry Cottrill is a pulsejet designer, builder and experimenter
and Editor of jetZILLA ezine, living in the State of Iowa, USA.
To contact him about this article, email: Editor@jetzilla.com
_____________________________________________________
Photo Copyright 2004 Steve Bukowsky
_____________________________________________________
Photo Credits:
All photos in this article were provided by, and are property of,
the author or Mr Steve Bukowski [used by permission].
_____________________________________________________
Larry Cottrill is a pulsejet designer, builder and experimenter
and Editor of jetZILLA ezine, living in the State of Iowa, USA.
To contact him about this article, email: Editor@jetzilla.com
_____________________________________________________
|